So today I am doing a tutorial on how I made Evangeline Beamans dress, here it is moddled by Hilda Robinson since I sewed this dress before the arrival of Evangeline.
You will need:
- Sewing needle
- Sewing thread (I used white)
- Fabric (I used one patterned and one white)
- PVA glue
- Ruler
- Chalk
Optional:
- Ribbon, pearls or lace to decorate
- Felt or simmilar for little jacket.

So very first of all I drew the dress on a little whiteboard, I do this to plan what I kind of want the dress to look like though I often change the decorating.

Now I marked 21cm of my patterned fabric. I used chalk for marking since it can easily be rubbed off while pencil or pen is very difficult to remove.

As you can see, it is a fraying fabric and therefore a bit more difficult to use.

What I did to stop the fraying was apply a little bit of PVA glue and fold over instead of hemming the edges. You just need a little bit of glue since too much will result that your fabric will be hard.

Once I had glued over the ends, I put on a ruler and something heavy so that it would dry falt, if your fabric was not fraying easily, you will not have to do this but just sew.

While that is drying you want to cut another piece of fabric in roughly a rectangle.

After you have done this, fold it in half and cute one side to about 5-10mm before the middle.

Next cut a half circle out in the middle, this is where your figures head will go through.

Test that it fits!

This is kind of hard to explain but you just want to sew and hem the tail hole.

Cut a slit in the fabric for your arm hole like in the photo above.

It is good if you cut it slightly longer than your figures arm so you can then fold it back.

So this is what it should look like, sew the open slit a the bottom together.

This is what it should look like once you have done both hands

Now you sew something on that will keep the whole thing together at the back, for example velcro.

Sew on the bottom fabric.

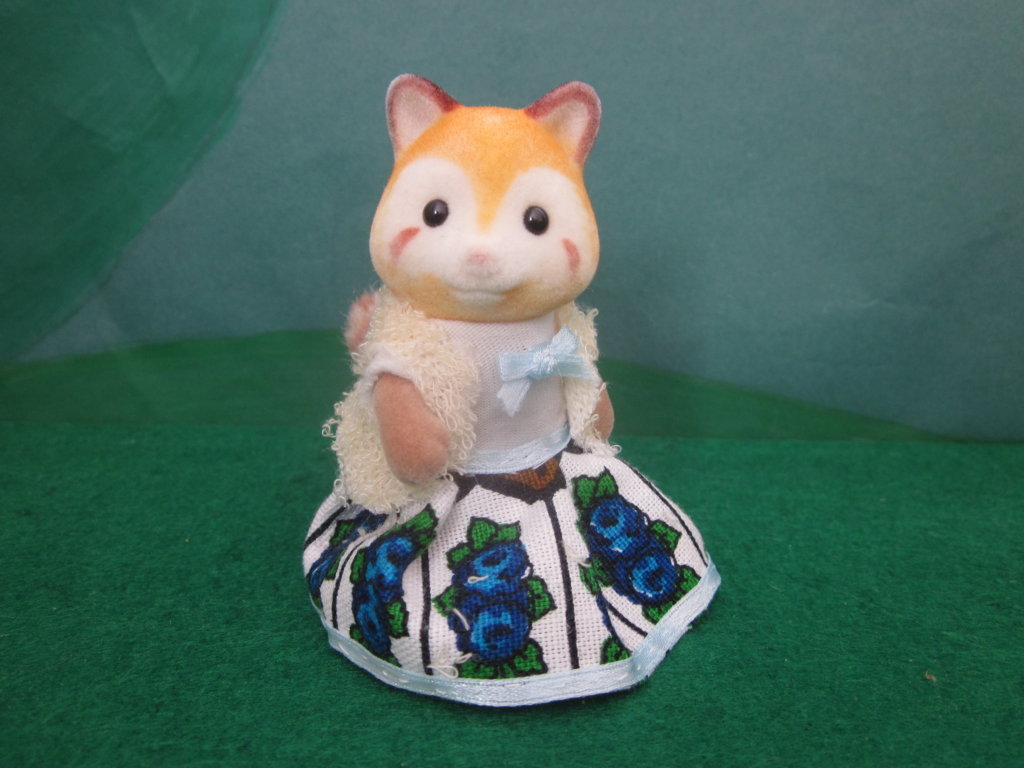
This is what the outfit looks like now after I decorated it with ribbon.
I also added a little jacket which makes the dress look better in my opinion.

This is a picture of Evangeline wearing her dress, I think it looks much better than the old one!
I hope that you have enjoyed this tutorial. I am really happy with how this dress turned out and I love trying out dress tutorials for my sylvanians. I am now going to work on the background image etc. for my re design, I will write a post when I have finished.
Only 42 days till christmas!
Emily
The first time I saw Evangeline wearing this dress I thought she looked great!
I love the fabric you used for the skirt and the little vest you also made . I´m glad you posted a tutorial. It´s really helpful for people like me with no skills for sewing. I did my first attempts this summer but they didn´t come out very well.I´ll keep trying.
Aw, thats fine. It takes practise to sew things you are happy with (I know from experiance). It is great so hear that you are keeping on trying. You know that raincoat tutorial I promised to do? Well, I am working on it. Have a great rest of your day!
Emily
That’s such a pretty dress! 🙂 Well done, she looks great in it!
Thank you, I had a lot of fun making it!
Emily
I really must try this- the dress looks beautiful 🙂
Thank you! I would however reccomend not using a strechy fabric since when you hem the edges it streches and makes the sewing wonky.
Emily
Hello Emily,
Oh wow, great work!
The fabric with the blue flowers on it is perfect for a dress.
Bye, Nina
Thank you! I have always wanted to make a dress using that fabric.
Emily